Podcast Production 2 – Post Production Tools
After getting a WAV recoding from Pamela as detailed in a previous post, I like to set up a special physical environment for working with a podcast during production, just like I build a workspace structure for working with a Visual Studio project.
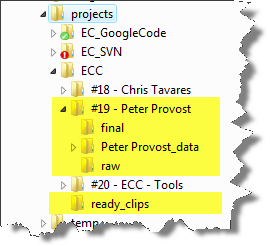
The structure I have landed on looks something like this:
Examining folder structure:
c:\projects\ECC
This is my root folder for all work on the Elegant Code Cast.
?\ECC\#19 ? Peter Provost
This is a root folder for a show. I create this folder manually.
?\ECC\#19 ? Peter Provost\raw
This is where I drop a copy of the raw recording for use in production. I have been burned by not keeping a copy out on another machine somewhere. I can always back up to this version in the event I screw up in later steps.
?\ECC\#19 ? Peter Provost\final
This is where I will later export the final versions of the produced audio files. It is here that final steps like MP3 conversion and tagging occur.
?\ECC\#19 ? Peter Provost\Peter Provost_data
This folder is created by Audacity in a future step.
The following steps assume the above folder structure is created including:
ECC\showname
ECC\showname\raw
ECC\showname\final
Working With Audacity
Preparing the Raw Recording
Sometimes, I forget to select the ?record to stereo channels? setting in Pamela, as I specified in the previous post. The result of this is a mono recording with dramatically different levels in the audio. Opening the WAV file in Audacity, you see a waveform like this:
This is bad news because one person is being recorded with high gain and the other with low. Separating out the voices is basically impossible.
The best I can do here is to open the file in Audacity and amplify the quieter segments until I get a wave form that looks like this:
Baseline Processing of the Whole Track
The rest of the audio editing will be done in Audacity. Now that I have the interview itself inside Audacity, there are a few standard steps I do to get the track ready to cut.
- Normalize filter. This essentially centers the wave form.
- High pass filter. Cut out all sound under 200 Hz. This is ?getting rid of the mud? and takes out the murky tones we don?t really hear anyway in a simple vocal conversation.
- Noise removal. Zoom in rel close and grab some white noise. Use this as a baseline for the noise removal analysis and then remove that sound across the entire track. I may have to play with it a little to find the right amount of noise to pull out so that the voices don?t start sounding tinny. Undo is your friend. I usually end up running the noise removal filter at about 6db.
Cutting the Interview
After all that, now it is time to listen to the interview, cutting out the parts that need to be removed. There are often segments in the interview where we break for a moment or pause to prepare the next question, etc.
Adding Bumpers
Doesn?t that sound totally professional? What it really means is adding a pre-recorded ending and lead-in music.
I also record an introduction via my head mike right into Audacity and then use Audacity?s ducking feature to lower the music under my voice.
Creating the MP3
It would be great if I could export the final MP3 right from Audacity, and indeed there is an export to MP3 function that uses the LAME MP3 encoder. Unfortunately, my experience with the encoder is that it introduces a bit of ?flutter? on the top end of the audio track. Because of this, I export the entire interview as a single WAV file into the ?/final folder.
There are a ton of audio format converters out there, an presently I am using Switch. This takes me from WAV to MP3.
Tagging the MP3
The MP3 needs to have some meta data embedded into it to play nice with MP3 players, and specifically with iTunes and iPods. iX devices look for some specific and proprietary meta data and tags within the MP3s to make the playback experience nicer. As an example, we can embed an image that will show as the album art during playback.
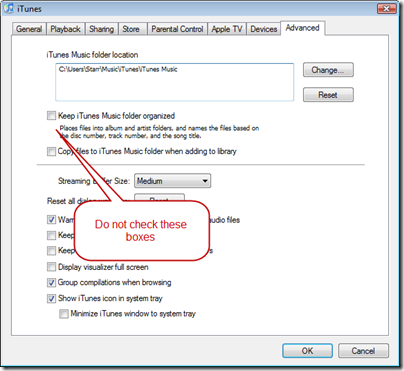
I find this is all easiest with iTunes. TO ensure you don?t end up FTPing the wrong audio file up to your file server, take a look at the image of the iTunes preferences I have set up. If either of these boxes are selected, iTunes may move your file around and you?ll lose it.
Simply add the file to your media library in iTunes and then
Right click | Get Information
on the episode.
This brings up the dialogs that give the ability to edit meta data. Save the file, you?re done.
Posting the Show
FTP the file up to your favorite file server and link to it in your RSS feed.
Viola! You?re a new media icon.


Recent Comments